
API Generation Guide

Transform your database schema into a fully functional REST API in seconds.

Learn how Endora automatically generates production-ready APIs with authentication, validation, documentation, and testing interfaces.

๐ŸŽฏ What You'll Learnโ€‹

  • โœ… Automatic API generation process
  • โœ… Generated endpoint structure
  • โœ… Authentication and security
  • โœ… API testing and validation
  • โœ… Documentation generation
  • โœ… Performance optimization

๐Ÿ“น API Generation Overviewโ€‹

๐ŸŽฅ

From Schema to API in Seconds

Replace this entire section with your API generation overview video

Video Placeholder: Insert your API generation overview video here

See how Endora transforms your database schema into a complete REST API with all the features you need.

๐Ÿš€ Understanding API Generationโ€‹

What Gets Generated?โ€‹

For each table in your schema, Endora automatically creates:

  • Complete CRUD Operations: Create, Read, Update, Delete
  • Authentication: API key-based security
  • Validation: Input validation and data sanitization
  • Documentation: Interactive Swagger UI
  • Testing Interface: Built-in API testing tools
  • Analytics: Usage monitoring and performance metrics

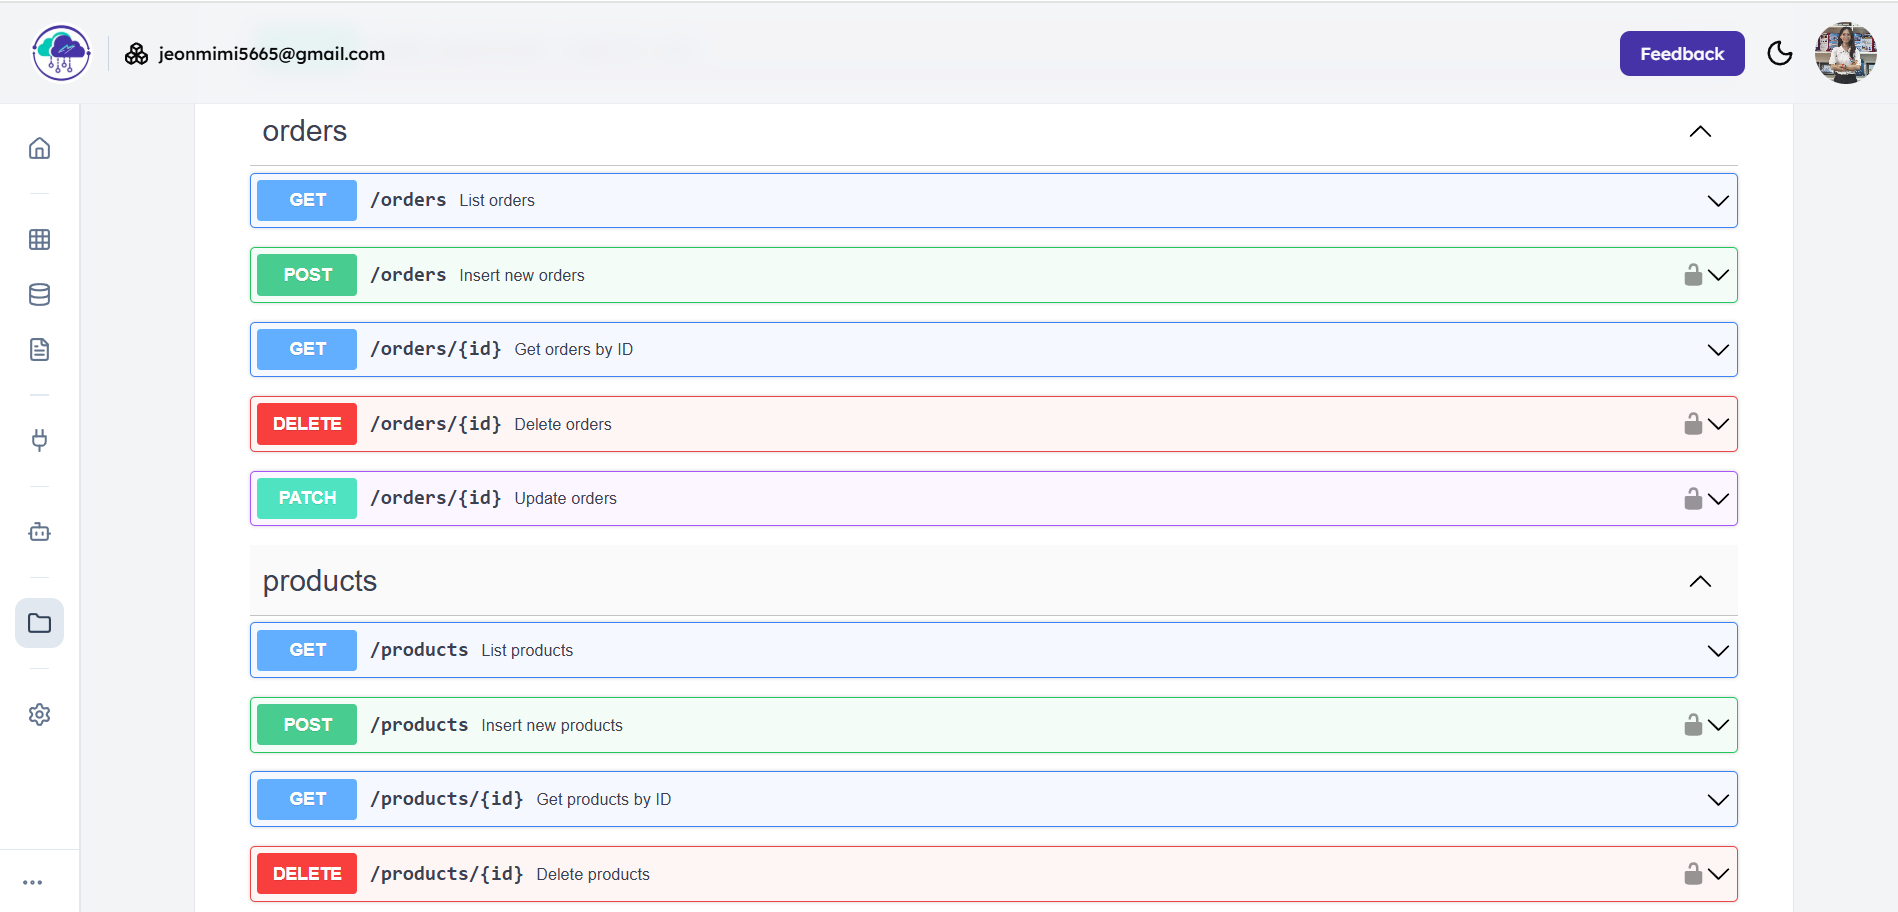
Generated Endpoint Structureโ€‹

POST   /table-name          # Create new record
GET /table-name # List all records (paginated)
GET /table-name/{id} # Get specific record
PUT /table-name/{id} # Update entire record
PATCH /table-name/{id} # Partial update
DELETE /table-name/{id} # Delete record

๐Ÿ“น API Generation Processโ€‹

๐ŸŽฅ

Step-by-Step API Generation

Replace this entire section with your API generation process demonstration

Video Placeholder: Insert your API generation process demo here

Watch the complete process of generating APIs from your database schema.

๐Ÿš€ Generating Your APIโ€‹

Step 1: Review Your Schemaโ€‹

Before generating your API:

  1. Check Table Structure: Ensure all tables are properly defined
  2. Verify Relationships: Confirm foreign key relationships are correct
  3. Review Constraints: Check validation rules and data types
  4. Optimize Performance: Add indexes for frequently queried columns

Step 2: Configure API Settingsโ€‹

  1. Authentication: Choose authentication method (API Key recommended)
  2. Rate Limiting: Set request limits (100/hour for free tier)
  3. CORS Settings: Configure cross-origin resource sharing
  4. Response Format: Choose JSON response structure

Step 3: Generate Endpointsโ€‹

  1. Click "Generate API": Start the automatic generation process
  2. Review Generated Endpoints: Check all created CRUD operations
  3. Configure Security: Set up authentication and permissions
  4. Test Endpoints: Use the built-in testing interface

๐Ÿ“น API Configurationโ€‹

๐ŸŽฅ

Configuring Your Generated API

Replace this entire section with your API configuration demonstration

Video Placeholder: Insert your API configuration demo here

Learn how to configure authentication, rate limiting, and other API settings.

๐Ÿ”ง Generated API Featuresโ€‹

Automatic CRUD Operationsโ€‹

Create (POST)โ€‹

POST /users
Content-Type: application/json
Authorization: Bearer YOUR_API_KEY

{
"name": "John Doe",
"email": "john@example.com",
"age": 30
}

Read (GET)โ€‹

# Get all users
GET /users?page=1&limit=10&sort=name&order=asc

# Get specific user
GET /users/123

Update (PUT/PATCH)โ€‹

# Full update
PUT /users/123
{
"name": "John Smith",
"email": "john.smith@example.com",
"age": 31
}

# Partial update
PATCH /users/123
{
"age": 31
}

Delete (DELETE)โ€‹

DELETE /users/123

Advanced Query Featuresโ€‹

Paginationโ€‹

GET /users?page=2&limit=20

Sortingโ€‹

GET /users?sort=created_at&order=desc

Filteringโ€‹

GET /users?filter[status]=active&filter[age]=25
GET /users?search=john

Include Relationshipsโ€‹

GET /users?include=posts,comments

๐Ÿ“น API Testing Interfaceโ€‹

๐ŸŽฅ

Testing Your Generated API

Replace this entire section with your API testing demonstration

Video Placeholder: Insert your API testing demo here

Learn how to use the built-in Swagger UI to test your API endpoints.

๐Ÿงช Testing Your APIโ€‹

Built-in Swagger UIโ€‹

  1. Open Testing Interface: Click "Test API" in your project
  2. Authenticate: Enter your API key in the authorization dialog
  3. Explore Endpoints: Browse all available operations
  4. Test Requests: Send real requests and see responses
  5. View Documentation: Read detailed endpoint documentation

Testing Workflowโ€‹

1. Authentication Setupโ€‹

Authorization: Bearer YOUR_API_KEY

2. Test Create Operationโ€‹

POST /users
{
"name": "Test User",
"email": "test@example.com",
"age": 25
}

3. Test Read Operationsโ€‹

GET /users
GET /users/1

4. Test Update Operationsโ€‹

PUT /users/1
{
"name": "Updated User",
"email": "updated@example.com",
"age": 26
}

5. Test Delete Operationโ€‹

DELETE /users/1

๐Ÿ“น API Documentationโ€‹

๐ŸŽฅ

Interactive API Documentation

Replace this entire section with your API documentation demonstration

Video Placeholder: Insert your API documentation demo here

See how Endora automatically generates comprehensive API documentation with examples and testing capabilities.

๐Ÿ“š Generated Documentationโ€‹

Automatic Documentation Featuresโ€‹

  • Endpoint Descriptions: Detailed information about each endpoint
  • Request/Response Examples: Sample requests and responses
  • Parameter Documentation: Complete parameter descriptions
  • Authentication Guide: How to authenticate requests
  • Error Handling: Common error codes and messages
  • Rate Limiting: Usage limits and headers

Interactive Featuresโ€‹

  • Try It Out: Test endpoints directly in the browser
  • Request Builder: Visual request construction
  • Response Viewer: Formatted response display
  • Error Handling: Clear error messages and solutions

๐Ÿ”’ Security Featuresโ€‹

Authenticationโ€‹

  • API Key Authentication: Secure access control
  • Request Signing: Optional request signature validation
  • Rate Limiting: Prevent abuse and ensure fair usage
  • IP Whitelisting: Restrict access to specific IP addresses

Data Protectionโ€‹

  • Input Validation: Automatic validation of all inputs
  • SQL Injection Prevention: Parameterized queries
  • XSS Protection: Output sanitization
  • CORS Configuration: Cross-origin request handling

๐Ÿ“น Security Configurationโ€‹

๐ŸŽฅ

Securing Your Generated API

Replace this entire section with your security configuration demonstration

Video Placeholder: Insert your security configuration demo here

Learn how to configure authentication, rate limiting, and other security features.

๐Ÿ“Š Performance Featuresโ€‹

Built-in Optimizationโ€‹

  • Database Indexing: Automatic index creation for foreign keys
  • Query Optimization: Efficient database queries
  • Response Caching: Intelligent caching strategies
  • Connection Pooling: Optimized database connections

Monitoring and Analyticsโ€‹

  • Request Tracking: Monitor API usage patterns
  • Performance Metrics: Response times and throughput
  • Error Monitoring: Track and analyze errors
  • Usage Analytics: Understand how your API is being used

๐Ÿ“น Performance Monitoringโ€‹

๐ŸŽฅ

Monitoring API Performance

Replace this entire section with your performance monitoring demonstration

Video Placeholder: Insert your performance monitoring demo here

Learn how to monitor your API's performance and usage with built-in analytics.

๐Ÿš€ Integration Examplesโ€‹

JavaScript/Node.jsโ€‹

// Fetch all users
const response = await fetch("https://api.endora.space/v1/your-project/users", {
headers: {
Authorization: "Bearer YOUR_API_KEY",
"Content-Type": "application/json",
},
});
const users = await response.json();

// Create a new user
const newUser = await fetch("https://api.endora.space/v1/your-project/users", {
method: "POST",
headers: {
Authorization: "Bearer YOUR_API_KEY",
"Content-Type": "application/json",
},
body: JSON.stringify({
name: "John Doe",
email: "john@example.com",
age: 30,
}),
});

Pythonโ€‹

import requests

# Get all users
response = requests.get(
'https://api.endora.space/v1/your-project/users',
headers={'Authorization': 'Bearer YOUR_API_KEY'}
)
users = response.json()

# Create a new user
new_user = requests.post(
'https://api.endora.space/v1/your-project/users',
headers={'Authorization': 'Bearer YOUR_API_KEY'},
json={
'name': 'John Doe',
'email': 'john@example.com',
'age': 30
}
)

cURLโ€‹

# Get all users
curl -X GET "https://api.endora.space/v1/your-project/users" \
-H "Authorization: Bearer YOUR_API_KEY"

# Create a new user
curl -X POST "https://api.endora.space/v1/your-project/users" \
-H "Authorization: Bearer YOUR_API_KEY" \
-H "Content-Type: application/json" \
-d '{"name": "John Doe", "email": "john@example.com", "age": 30}'

๐Ÿ“น Integration Examplesโ€‹

๐ŸŽฅ

Integrating Your API

Replace this entire section with your integration examples demonstration

Video Placeholder: Insert your integration examples demo here

See how to integrate your generated API with various programming languages and frameworks.

๐ŸŽฏ Best Practicesโ€‹

API Designโ€‹

Use RESTful Conventions

Follow REST principles for consistent, predictable APIs

Implement Proper Error Handling

Return meaningful error messages with appropriate HTTP status codes

Add Request Validation

Validate all inputs to ensure data quality and security

Document Everything

Provide comprehensive documentation for all endpoints

Performance Optimizationโ€‹

Use Pagination

Implement pagination for large datasets to improve performance

Add Caching

Use caching strategies to reduce database load

Monitor Performance

Track API performance and optimize based on usage patterns

Scale Horizontally

Design for horizontal scaling as your API grows

๐Ÿš€ Next Stepsโ€‹

Your API is Ready!โ€‹

After generating your API:

  1. Test All Endpoints: Verify functionality using Swagger UI
  2. Configure Security: Set up authentication and rate limiting
  3. Monitor Usage: Track performance and usage patterns
  4. Integrate: Start using your API in applications

Learn Moreโ€‹

Advanced Featuresโ€‹


Ready to deploy your API? Learn about deployment โ†’ ๐Ÿš€